Quest Mod Development Intro
Learn how to get started writing your own Quest Mods.
Getting Started
WARNING
This guide is for making mods for the Quest Standalone version of Beat Saber!
If you use Oculus Link or similar, visit the PC Mod Development Guide as that uses the PC version of the game.
Make sure your game is modded before trying to make a mod. See instructions for modding Beat Saber on Quest.
This guide assumes you have a basic to intermediate understanding of C#, Unity, and C++. You may have difficulty understanding what is covered here if you do not have this foundation.
While this guide is for development on Windows, it is not dependent on an IDE. Instead you should configure your preferred IDE accordingly by referring to the documentation. For example, you would need to install clangd for VSCode or configure CMake for CLion.
TIP
For Quest mod development with VSCode, while the Microsoft C++ extension can be used, the clangd extension is recommended due to better property support and easier setup with the build systems used.
Environment Setup
The following pieces of software are needed to follow this guide.
- QPM - Dependency management
- Python - Cross-platform utility scripts
- CMake - Build system
- Ninja - Build tool
- Android NDK - Native Development Kit for Android
QPM
Download the latest QPM binary for your system, extract qpm.exe, and add it to your PATH variable. Alternatively, download and run the Windows installer.
Python
Download the latest Python version for your system and run the installer. Make sure to select the option to add Python to PATH.
If you already have Python, it will likely work, but at least version 3.8 is required.
CMake
Download the latest CMake binary for your system and add it to your PATH variable. Alternatively, download and run the Windows installer.
Ninja
Download Ninja via QPM using qpm download ninja.
Alternatively, download the latest Ninja binary for your system and add it to your PATH variable.
Android NDK
Download the Andoid NDK via QPM using qpm ndk download 29, and add the extracted directory to a new environment variable called ANDROID_NDK_HOME. You can also run qpm ndk pin 29 in a project directory to only apply the NDK, with that specific version, in the current project.
Alternatively, you can download the NDK manually from the Android NDK Downloads page and set the ANDROID_NDK_HOME environment variable to the root of its extracted files.
WARNING
Make sure the full path to your NDK does not have any spaces in it. If you used QPM to download the NDK, this means that your username must not have any spaces in it.
Create a Project
Once you have setup your environment, you can now begin making your mod. This guide uses Metalit's template. To start out using the template, run the following command in the terminal.
qpm templatr --git https://github.com/Metalit/quest-mod-template.git <destination>Templatr will then ask a series of questions to create a mod project.
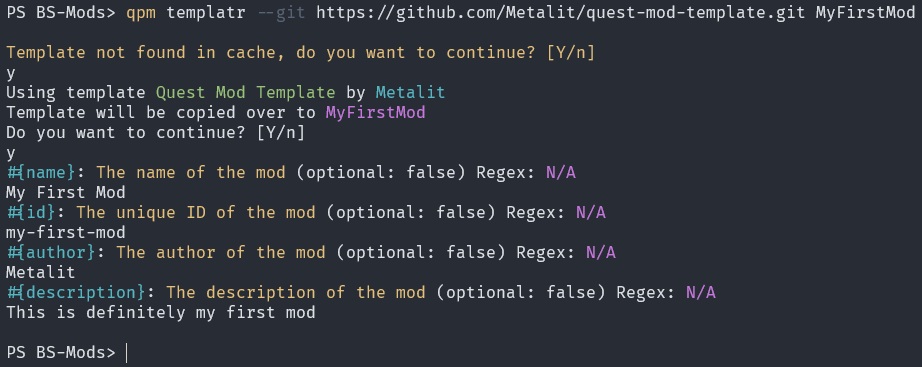
Before you can start working on the project, you must restore all of the dependencies. Consider this step similar to fully initializing the project.
TIP
By default, QPM will attempt to use symlinks for restored dependencies to save storage space. On Windows, non-administrator users are only able to create symlinks if Windows developer mode is enabled. The feature can also be disabled in QPM with the command qpm config symlink disable.
In a terminal in the project directory, run:
qpm ndk resolve
qpm restore
Project Contents
Your project should now contain the following structure:
.github/workflows/
└── ... auto-build actions
extern/
└── ... restored dependencies
include/
└── main.hpp
src/
└── main.cpp
.clang-format
.clangd
.gitignore
CMakeLists.txt
extern.cmake
mod.template.json
qpm_defines.cmake
qpm.json
qpm.shared.json
README.md
Files Breakdown
.github/workflows/
This folder contains workflow definitions for GitHub actions to automatically build and release your mod. By default, it will make a test build of your mod every time you push a commit, and allow a release to be automatically made by a manual trigger.
extern/
The extern folder contains your dependencies, similarly to node_modules with NodeJS or packages with .NET Core. You shouldn't modify any files in this folder.
include/main.hpp
main.hpp is a small header file that contains the logging mechanism for your mod, so it can be included and used in any source file.
src/main.cpp
main.cpp contains the basic code required to make your mod interface with the modloader. Take a look at the comments in the file for more detail.
.clang-format
This file defines autoformatting rules that can be used by the clang-format tool.
.clangd
This file defines rules for the clangd language server.
CMakeLists.txt
CMakeLists.txt is the entry point of the build system. Customizing it is outside the scope of this tutorial.
extern.cmake
extern.cmake is also part of the build system, and is automatically generated by QPM to ensure dependencies are compiled and linked correctly, so it should not be edited.
mod.template.json
The mod.template.json file is used as a template to generate your mod.json file, part of the QMOD format. Tokens such as ${mod_id} and the dependencies are automatically filled in by QPM, but the cover image, description, and game version properties should be modified here.
qpm_defines.cmake
qpm_defines.cmake is like extern.cmake, but instead of containing dependency configuration, is generated with properties related to your project (such as MOD_ID). It also should not be edited.
qpm.json
qpm.json defines all the metadata needed by QPM to manage and build your project, such as name, version, dependencies, and more. The template should populate it for you, but you may find yourself wanting to modify items in the info section as you continue development.
qpm.shared.json
This file is generated by QPM whenever you run qpm restore. It contains a copy of your qpm.json at the time, and serves as a lockfile for dependency versions.
Next Steps
To build your basic mod, run qpm qmod zip. This will create the QMOD file in your project folder, which you can install with MBF. At the moment, it won't do anything other than output a few log messages. Follow the rest of the guides to make it do more!
Game Interaction
To actually start modifying the game, you'll need to learn about hooks and custom types, installing and testing your mod, and some Quest-specific nuances of the game.
For the next steps in creating your first mod, go to the game interaction guide.
Configs and UI
Many mods will need to have settings to tailor their behavior to the user's preference. For simple configs to more advanced UI, follow the configuration and user interface guide.
Mod APIs
To interact with other mods, or allow them to interact with your mod, you'll need to make an API. Multiple methods of doing so, to solve various different problems, can be found in the mod API guide.
Credits
Initial guide content was integrated from the Beat Saber Quest Modding Guide by Calum with contributions from Raine and Pangwen, and modernization by Metalit. Integration and editing was done by Bloodcloak.